Official sources referenced
Pre-Application Checklist
#Before applying for an Australian visa, it's crucial to understand the pre-application requirements. For skilled visas such as the Skilled Independent Visa (subclass 189), you must first submit an Expression of Interest (EOI) through the SkillSelect system. You can only proceed with your application once you receive an invitation from the Department of Home Affairs.
Choose the Right Visa Category
Australia offers a variety of visa categories depending on your purpose for visiting or staying. Here are some key categories to consider:
- Skilled Visas: Ideal for skilled workers, these include the Skilled Independent 189 and Skilled Nominated 190 visas.
- Student Visa (subclass 500): For those intending to study in Australia.
- Visitor Visa (subclass 600): Suitable for short-term visits for tourism or business.
- Working Holiday Visa (subclass 417): For young adults who wish to holiday and work in Australia.
Ensure that the visa category you choose aligns with your intended activities in Australia.
Gather Necessary Information
Before lodging an application, gather all pertinent information:
- Personal Details: Full name, date of birth, and contact information.
- Passport Information: Valid passport number, issue and expiry dates.
- Professional Credentials: If applying for a skilled visa, provide details of your qualifications and work experience.
You don't need to upload documents when submitting an EOI, but having this information at hand ensures a smooth process.
Check Eligibility Requirements
Each visa type has specific eligibility criteria. For skilled visas, like the Skilled Work Regional 491, you must:
- Submit an EOI and be invited to apply.
- Meet the points requirement, which varies by visa type.
- Have a valid skills assessment.
Important: Failure to submit an EOI before applying for a skilled visa will result in rejection. Make sure to verify all eligibility details on the official Department of Home Affairs website.
Create an Immi Account
To access online visa services, you need an Immi Account. This account allows you to:
- Start and manage your EOI.
- Track the status of your visa application.
- Update personal details.
After creating your account, ensure to log in with the code sent to your registered email.
Tip: Always keep your login details secure and update your email address if it changes to avoid missing important notifications.
By following this pre-application checklist, you'll be well-prepared to proceed with your Australian visa application. For more detailed guidance, refer to our Documents Checklist and Visa Refusal Reasons to avoid common pitfalls.
How to Submit Your Application
#-
Create an ImmiAccount
Begin the process by creating an ImmiAccount, which is essential for accessing Australia's online visa services. This account will serve as your primary platform for lodging visa applications, tracking their status, and managing any correspondence with the Department of Home Affairs. Ensure that you use a valid email address, as this will be used for all communications and for receiving important access codes.
-
Submit an Expression of Interest (EOI)
If you are applying for a skilled visa such as the Skilled Independent Visa (subclass 189), Skilled Nominated Visa (subclass 190), or Skilled Work Regional (Provisional) Visa (subclass 491), submitting an Expression of Interest (EOI) through SkillSelect is a crucial step. This allows you to indicate your interest and qualifications to live and work in Australia. You are not required to upload documents during this stage, but you must provide accurate personal information. Remember, you must be invited to apply for the visa after submitting your EOI.
-
Receive an Invitation to Apply
After your EOI is submitted, it will be ranked alongside other applicants based on factors such as skills, experience, and other criteria specified by the Department of Home Affairs. If your EOI meets the requirements and ranks highly, you will receive an invitation to apply for your selected visa. This is a critical step, as you cannot proceed without this invitation.
-
Lodge Your Visa Application
Once you have received an invitation, you can proceed to lodge your visa application through your ImmiAccount. Carefully review all instructions provided by the Department of Home Affairs to ensure that you meet the specific eligibility requirements for your visa category. Gather all necessary documents, such as identity papers, qualifications, and work experience evidence, as outlined in the Documents Checklist.
-
Pay the Application Fee
As part of the application process, you will need to pay the relevant visa application fee. The fee amount varies depending on the visa subclass, so check the current rates on the official Department of Home Affairs website. Ensure that the payment is made online through your ImmiAccount to facilitate immediate processing.
-
Track the Progress of Your Application
Once your application is lodged, you can track its progress through your ImmiAccount. The Department of Home Affairs will update the status of your application as it progresses through the various stages of processing. For more detailed information on expected timelines, you may refer to the Processing Times guide.
Tip: Keep your contact information up to date in your ImmiAccount to receive timely notifications about your application status.
By following these steps, you can efficiently manage the process of applying for an Australian visa. It's important to stay informed and follow all instructions provided by the Department of Home Affairs to avoid any delays or issues with your application.
Application Costs
#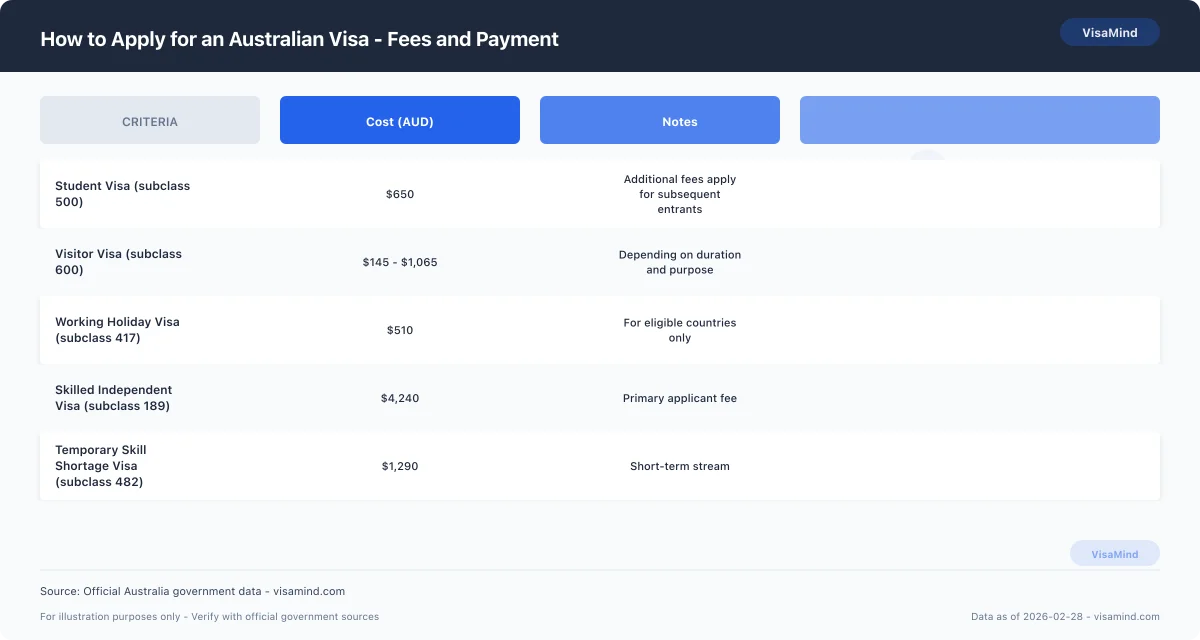
You must be aware of the application fees associated with your specific visa category. The Department of Home Affairs provides a detailed schedule of fees that apply to different visas. For instance, the cost for a Skilled Independent Visa (subclass 189) might differ from that of a Visitor Visa (subclass 600). It's crucial to check the latest fees on the official website before applying, as these amounts can change.
Here is a brief overview of possible costs:
- Primary Applicant Fee: This is the main fee for the visa application.
- Secondary Applicant Fee: If you have family members included in your application, additional fees apply.
- Surcharges: Credit card payments incur surcharges, so consider this when choosing your payment method.
Important: Ensure that you have the correct amount available when applying, as insufficient payment can delay the processing of your visa application.
Payment Methods
The Department of Home Affairs offers several payment methods for visa applications. You can make your payment using:
- Credit or Debit Card: Visa, MasterCard, American Express, and Diners Club are commonly accepted. Be mindful of possible surcharges.
- Paypal: Available for some applications.
- BPAY: Useful for those with an Australian bank account.
- UnionPay: Another option for some applicants.
Tip: Verify the accepted payment methods for your specific visa application through your Immi Account to avoid any delays.
Refund Policy
In some cases, you may be eligible for a refund of your visa application fees. However, refunds are typically not granted simply because your circumstances have changed or if your application is refused. Refunds are generally considered under specific circumstances, such as:
- Incorrect Payment: If you overpaid or paid the wrong fee.
- Department Error: If the Department of Home Affairs made an error in processing your application.
To request a refund, you must contact the Department of Home Affairs directly and provide evidence supporting your claim. Always check the latest refund policies on the official website to ensure you meet the criteria.
Tracking Your Application
#Tracking your Australian visa application is a straightforward process with the Department of Home Affairs. Once you have submitted your Expression of Interest (EOI) and received an invitation to apply for a skilled visa, you can monitor the progress of your application through your Immi Account.
How to Track Your Visa Application
After lodging your application, you can easily track its status by logging into your Immi Account. This online portal provides real-time updates on your application status, and it is crucial to check it regularly to stay informed about any requests for additional information or changes in status.
Tip: Ensure that you have access to the email address linked to your Immi Account, as important notifications and a login code will be sent there.
Expected Timeline
The processing time for Australian visas can vary significantly depending on the type of visa you’re applying for. While the Processing Times guide can provide estimates, typical timelines may range from a few weeks to several months. It's essential to account for these variations, especially if you're planning to move or start work in Australia.
| Visa Type | Estimated Processing Time |
|---|---|
| Skilled Independent (subclass 189) | 6 to 12 months |
| Skilled Nominated (subclass 190) | 8 to 10 months |
| Skilled Work Regional (subclass 491) | 6 to 12 months |
What to Do While Waiting
While waiting for the outcome of your visa application, there are several proactive steps you can take:
- Prepare for Arrival: Start planning your move to Australia by researching cities, housing options, and employment opportunities.
- Stay Informed: Keep an eye on any correspondence from the Department of Home Affairs and respond promptly to any requests for additional documentation.
- Explore Visa Options: Consider reviewing other visa types like the Visitor Visa (subclass 600) or Working Holiday Visa (subclass 417) for temporary stays.
Important: If you receive a request for additional information, respond by the specified deadline to avoid delays.
By staying engaged and informed throughout the application process, you can ensure a smoother transition to living and working in Australia.
If Something Goes Wrong
#If you're navigating the Australian visa application process, it's important to understand your options if something goes wrong. Whether your application is refused or you encounter other issues, knowing your rights and the available avenues for recourse can make a significant difference.
What If Your Visa Application Is Refused?
In the unfortunate event that your visa application is refused, you have several potential pathways to consider:
- Review the Refusal Notice: Carefully read the refusal notice sent by the Department of Home Affairs. It will outline the reasons for the decision and any steps you can take next.
- Appeal Rights: Depending on the type of visa and the circumstances of refusal, you may have the right to appeal to the Administrative Appeals Tribunal (AAT). This independent body can review decisions made by Home Affairs.
- Time Limits: Appeals must be lodged within a specific timeframe, typically within 21 calendar days of receiving the refusal notice. Confirm the exact deadline in your refusal notice.
Important: Missing the appeal deadline means you forfeit the right to challenge the decision through the AAT.
Can You Reapply for the Same Visa?
If your visa application is refused, you may choose to reapply, provided you address the reasons for the initial refusal:
- Assess Eligibility: Ensure that you meet all the requirements before submitting a new application.
- Address Concerns: Modify your application to correct the deficiencies cited in the refusal notice.
- Consider Alternative Visas: Explore other visa options that might be more suitable for your circumstances, such as the Skilled Work Regional Visa (subclass 491) or the Student Visa (subclass 500).
Administrative Review Options
If technical issues or administrative errors occurred during your application, you might have additional options:
- Contact Home Affairs: For minor mistakes or technical issues, contact Home Affairs directly through your Immi Account to seek clarification or rectification.
- Technical Assistance: Utilize the technical guides provided by Home Affairs if you face issues with online systems like SkillSelect.
Tip: Always keep a record of your communications with Home Affairs, including dates and reference numbers.
Understanding your rights and options if something goes wrong during your Australian visa application is crucial. For further guidance, consider reviewing resources such as the Visa Refusal Reasons guide to better understand potential pitfalls in your application.
Expected Timeline
#When you're planning to apply for an Australian visa, understanding the expected timeline is crucial. Below is a summary of the key stages and expected durations for different visa types, helping you plan your journey efficiently.
Expected Timeline Overview
| Phase | Description | Timeframe |
|---|---|---|
| Expression of Interest (EOI) | Submitting an EOI is the initial step for certain skilled visas, such as the Skilled Nominated Visa (subclass 190). | Varies; typically assessed within a few weeks to several months, depending on demand and visa category. |
| Invitation to Apply | After your EOI is assessed, you may receive an invitation to apply for the visa. | You have 60 days from the invitation date to lodge your application. |
| Application Processing | Once your application is submitted, it undergoes processing by the Department of Home Affairs. | Processing times can range from a few weeks to several months. Check the Processing Times for specific details. |
| Decision Notification | You'll be notified of the outcome of your visa application. | Notification times vary; you can track your application through your Immi Account. |
Additional Considerations
Tip: Ensure your Immi Account details are up-to-date to receive timely notifications and updates. This can prevent unnecessary delays.
While these timelines provide a general framework, keep in mind that individual cases may vary. Factors such as the completeness of your application, demand for the specific visa type, and any additional checks required can influence processing times. If you're applying for a tourist visa, consider the Visitor Visa (subclass 600) which typically has a quicker processing time compared to skilled visas.
For more detailed information on specific visa categories, explore the Documents Checklist to ensure you have all necessary documents ready before starting your application process.
Which System to Use
#-
Create an Immi Account
To begin your Australian visa application process, you need to create an Immi Account. This account is essential for accessing the Department of Home Affairs’ online services. You can create an account by visiting the official website and following the prompts to register. Make sure to use a valid email address, as this will be crucial for receiving updates and verifications.
-
Submitting an Expression of Interest (EOI) through SkillSelect
If you are applying for one of the skilled visas, such as the Skilled Independent Visa (subclass 189) or the Skilled Nominated Visa (subclass 190), you must submit an Expression of Interest (EOI) through SkillSelect. This step is mandatory before receiving an invitation to apply for the visa. While submitting an EOI, you will need to provide personal information but will not have to upload any documents at this stage.
-
Logging into Your Immi Account
Once you have registered your Immi Account, logging in requires a code sent to the email address you used to create your Expression of Interest. Ensure that you have access to this email and check for the verification code each time you log in. This added layer of security helps protect your personal information.
Important: Failing to submit an EOI before applying for a skilled visa will result in delays or denial of your application. Make sure your EOI is complete and accurate to avoid issues.
-
Seek Technical Assistance if Needed
If you encounter any technical difficulties while using SkillSelect or your Immi Account, the Department of Home Affairs provides a technical guide to help you troubleshoot common issues. Ensuring smooth access to these systems is crucial for a successful visa application process.
By following these steps and using the correct systems, you can efficiently manage your application process for an Australian visa. For more information on visa categories and detailed application processes, you may refer to guides like Documents Checklist or explore other visa options such as the Student Visa (subclass 500) and Working Holiday Visa (subclass 417).
Your Biometrics Appointment
#Once you have lodged your visa application with the Department of Home Affairs, you may be required to attend a biometrics appointment. This applies to various visa subclasses, including the Skilled Independent Visa (subclass 189) and the Student Visa (subclass 500). Biometrics collection is a mandatory step for many applicants and involves capturing your fingerprints and a photograph.
-
Receive Notification: After submitting your visa application, you will receive a notification from the Department of Home Affairs if biometrics are required. This notification will include instructions on how to schedule your appointment.
-
Locate a VFS Centre: Biometrics are typically collected at VFS Global centres. You can find the nearest centre by visiting the VFS Global website. Make sure to check the specific requirements and services offered at each location.
-
Book an Appointment: Follow the instructions provided in your notification to book an appointment at a VFS centre. It's crucial to schedule your appointment promptly, as processing delays can occur if biometrics are not submitted on time.
Preparing for Your Appointment
Before attending your biometrics appointment, ensure you have all necessary documentation ready.
-
Bring Identification: You will need to bring a valid passport and the appointment confirmation letter. Ensure your passport is valid for the entire duration of your intended stay in Australia.
-
Follow Dress Code: Wear appropriate attire for the photograph. Avoid wearing hats or any headgear unless it is for religious or medical reasons.
Tip: Arrive at the VFS centre at least 15 minutes before your scheduled time to allow for security checks and registration.
What to Expect During the Appointment
The biometrics appointment is a straightforward process that usually takes about 30 minutes.
-
Identity Verification: Upon arrival, your identity and documents will be verified by the VFS staff.
-
Biometric Collection: Your fingerprints will be digitally scanned, and a photograph will be taken. Ensure your fingers are clean and free of any cuts or abrasions.
Important: Failing to attend your biometrics appointment may result in delays or even the refusal of your visa application. Ensure you keep your appointment unless a reschedule is necessary.
For more detailed information on what to expect during your visa process, consider exploring guides like the Visa Refusal Reasons and Visa Extension Guide.
FAQs
Can I switch from a Visitor Visa (subclass 600) to a Skilled Independent Visa (subclass 189) while in Australia?
How can I track my Australian visa application after submission?
What happens if I encounter technical issues with Skill Select while applying for an Australian visa?
Is it necessary to submit an Expression of Interest (EOI) for all Australian visas?
What is the process to apply for a Working Holiday Visa (subclass 417) in Australia?
Can I combine a Working Holiday Visa (subclass 417) with a Student Visa (subclass 500) in Australia?
What is required for the biometrics appointment for an Australian visa application?
Sources
Last reviewed: March 1, 2026
VisaMind provides informational guidance only and is not a government agency. This is not legal advice. Requirements can change and eligibility depends on your specific facts. If your case is complex or high-stakes, consult a licensed immigration attorney.
Next steps
Requirements vary by nationality, purpose, timeline, and case details. Use Find My Visa to get a personalized checklist for Australia with official sources and deadlines.
Find my visa