Official sources referenced
Who This Guide Is For
#To embark on your journey as a digital nomad in Thailand, you will need to navigate the specifics of Thailand's visa process. Thailand offers a variety of visa options to accommodate different purposes, ranging from tourist visas to Long-Term Resident (LTR) Visas. It's important to understand that for digital nomads, specific visas such as the Smart Visa or LTR Visa can be particularly relevant, depending on your professional needs and duration of stay.
Who Should Use This Guide?
This guide is ideal for individuals who are currently outside of Thailand and are considering relocating to the country to work remotely. As a digital nomad, you likely need flexibility, and the guide addresses the various visa options available, including how to apply for them. If you're planning an extended stay and wish to work legally while enjoying Thailand's vibrant culture and stunning landscapes, this guide will provide the necessary insights.
Importance of Visa Selection
Understanding which visa suits your situation is crucial. For instance, the Smart Visa offers benefits such as extended stay periods and work privileges without the need for a separate work permit, making it a convenient option for digital professionals. Alternatively, if you plan on staying longer, exploring the LTR Visa could be worthwhile.
Tip: Make sure to apply from outside of Thailand, as the e-Visa process requires applicants to be overseas during the application stage.
Key Considerations
To ensure a successful application, gather all necessary documents and understand the specific requirements of each visa type. You're advised to review the instructions thoroughly to avoid common pitfalls such as failing to upload all required documents or submitting applications while in Thailand. Additionally, staying informed about processing times and fees is vital for proper planning.
By understanding these guidelines, you can make informed decisions and take the appropriate steps towards living and working in Thailand as a digital nomad.
What You Need to Know
#Thailand has become a popular destination for digital nomads seeking a vibrant culture, affordable living, and a wide range of visa options. Understanding the visa landscape is essential for digital nomads planning to work remotely from Thailand. The Immigration Bureau of Thailand provides several visa paths to accommodate varying needs, whether you are staying short-term, working, or considering a longer residency.
What Are Your Visa Options?
For digital nomads, there are several visa types worth considering based on your intended length of stay and purpose:
- Tourist Visa: Ideal for short stays, allowing you to explore Thailand while working remotely for a limited period. More details can be found on the Tourist Visa page.
- Non-Immigrant B Visa: Suitable for those planning to work for a Thai company or engage in business activities. Explore more on the Non Immigrant B page.
- Long-Term Resident (LTR) Visa: Provides a long-term solution for those looking to stay in Thailand for extended periods. Check the LTR Visa page for more information.
- Smart Visa: Designed for professionals in technology, innovation, and startups, offering benefits like an extended stay without a work permit. Details are available on the Smart Visa page.
How to Apply for a Visa from Outside Thailand
Digital nomads must apply for their visas before arriving in Thailand. The process primarily involves:
- Account Creation: Start by creating an account on the Thai e-Visa website.
- Online Application: Fill out the visa application form with accurate details.
- Document Upload: Upload necessary documents, including your passport and any supporting evidence.
- Fee Payment: Pay the visa fee through the online portal.
- Processing Period: Allow time for your application to be processed.
- Confirmation: Once approved, receive your e-Visa confirmation via email.
Tip: Ensure that you are outside Thailand when applying, as submitting an application from within the country is not permitted.
Important Considerations
- Eligibility: You must not currently be in Thailand to apply for an e-Visa.
- Supporting Documents: Failure to upload all required documents can lead to delays or rejection.
- In-Person Submissions: In some cases, you may need to present your passport and documents at a Royal Thai Embassy or Consulate-General.
What to Expect
After applying, monitor your email for updates on your application status. Processing times can vary, so it's advisable to apply well in advance of your planned travel. For a detailed look at the documents required, visit the Documents Checklist.
Navigating the visa process effectively requires understanding the specific requirements and options available. Whether you aim for a short-term adventure or a longer stay, Thailand offers diverse pathways to accommodate your digital nomad lifestyle. Always refer to the official Immigration Bureau website for the most current information and verify all details before proceeding.
Do You Meet the Requirements?
#To qualify as a digital nomad in Thailand, it's important to ensure you meet the specific criteria set by Thailand's Immigration Bureau. Here are the key requirements and prerequisites you need to consider:
General Eligibility
- Outside Thailand: You must apply from outside of Thailand. Applications for an e-Visa cannot be submitted if you are already in the country.
- Visa Type: Identify the appropriate visa for your intended stay. Options include the Tourist Visa, Non Immigrant B Visa, and Smart Visa, among others.
- Purpose of Stay: Clearly define your purpose of stay—whether it’s for work, leisure, or as a digital nomad.
Documentation Requirements
- Passport Validity: Ensure your passport is valid for at least six months beyond your intended stay.
- Supporting Documents: Gather necessary documents such as proof of employment or freelance work, financial statements, and health insurance. These must be uploaded during the application process.
Important: Failure to upload all required documents can result in delays or rejection of your application.
Financial Proof and Employment
- Income Requirements: Demonstrate a stable income source. While specific amounts may vary, you should verify current financial thresholds on the Immigration Bureau's website.
- Employer Support: If you are employed, provide a letter from your employer confirming your remote work arrangement, or if you are a freelancer, contracts or client agreements.
Application Process
- Create an Account: Register on the Thai e-Visa website to begin your application.
- Submit Details Online: Enter your personal information and visa details online.
- Upload Documents: Ensure all supporting documents are uploaded accurately.
- Pay Visa Fee: Complete the payment through the online portal.
- Await Processing: The processing time can vary, so check the Processing Times guide for current estimates.
- Receive Confirmation: Once approved, you will receive an e-Visa confirmation via email.
Tip: Applying online is recommended to avoid potential delays and receive immediate confirmation of submission.
Potential Pitfalls
- Incomplete Applications: Double-check all sections of your application for completeness.
- Incorrect Document Uploads: Ensure that all documents are clear and correctly uploaded as per the Documents Checklist.
Meeting these requirements is crucial for a successful application. Ensure all steps are completed accurately to enhance your chances of approval for a digital nomad stay in Thailand.
Your Action Plan
#Important: Ensure you begin your visa application process while outside Thailand, as applications cannot be initiated from within the country.
Step 1: Determine Your Eligibility and Visa Type
Before you start, assess which visa best suits your stay in Thailand. Common options for digital nomads include the Tourist Visa, Long-Term Resident (LTR) Visa, and Smart Visa. Each visa type has different requirements and benefits, so carefully review the eligibility criteria.
Consider your work situation and intended length of stay. For example, if you plan to work remotely for an extended period, the Smart Visa might be ideal. Alternatively, the LTR Visa is suitable for those looking to establish long-term residence.
Step 2: Gather Required Documents
Once you've chosen the appropriate visa, collect the necessary documents. Generally, you will need:
- A valid passport with at least six months' validity
- Passport-sized photographs
- Proof of income or financial stability
- Health insurance coverage (for certain visas)
- Evidence of accommodation in Thailand
For detailed checklists specific to each visa, refer to the Documents Checklist.
Step 3: Create an Account and Apply Online
Visit the official Thai e-Visa portal to create an account. This is the first step in accessing the online application system. Once registered:
- Complete the Online Application Form: Fill in your personal details, travel plans, and other required information.
- Upload Supporting Documents: Ensure all documents are scanned clearly and meet the size requirements. Missing documents can result in delays or rejection.
- Pay the Visa Fee: Fees vary depending on the visa type and duration of stay. Payments are made online, and receipts should be saved for your records.
Tip: Apply for your visa at least 30 days before your intended travel date to accommodate processing times.
Step 4: Await Processing and Receive Confirmation
After submission, the processing time typically ranges from a few days to several weeks, depending on the visa type and volume of applications. For specific timelines, consult the Processing Times.
- Check Your Email Regularly: You will receive updates and the e-Visa confirmation document via email. Keep this document safe, as you will need it for entry into Thailand.
Step 5: Present Your Visa Upon Arrival
Upon arrival in Thailand, present your e-Visa confirmation along with your passport to the immigration officer. Ensure you comply with any additional entry requirements that may be in place at the time of your travel.
- Keep Copies of All Documents: It's wise to maintain digital and physical copies of your visa, passport, and any other important documents during your stay.
Following this action plan will help you navigate the visa application process smoothly. Always verify any specific details or changes in requirements on the official Immigration Bureau of Thailand website.
What It Costs and How Long It Takes
#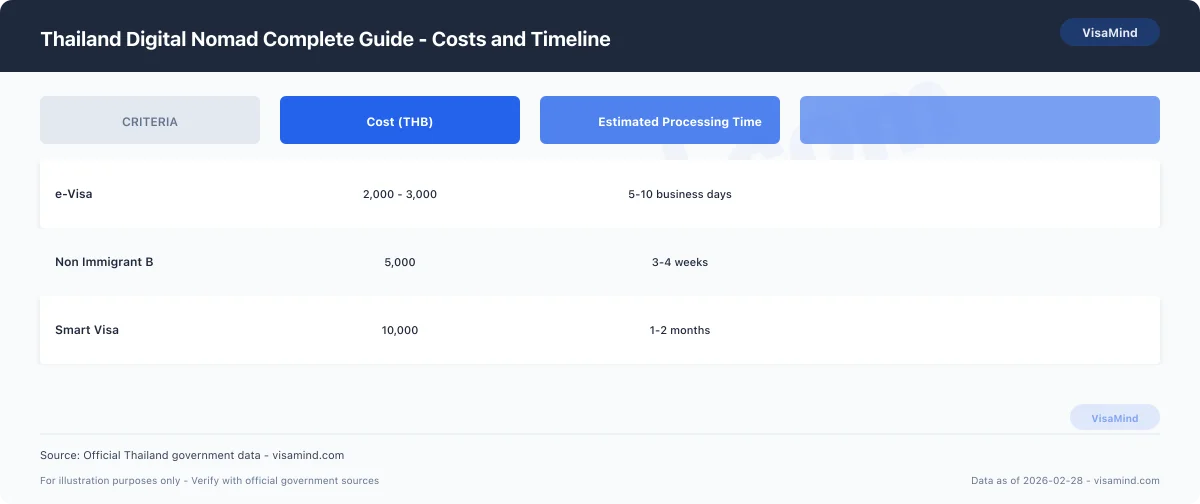
Understanding the costs and timelines associated with various visa options is crucial. Below is a comparison of some common visa types that digital nomads might consider, along with their costs and expected processing times.
Visa Options, Costs, and Timelines
| Visa Type | Eligibility | Cost (THB) | Processing Time |
|---|---|---|---|
| Tourist Visa | Short-term stay for tourism purposes | 1,500 | 5-10 business days |
| Non Immigrant B | Work-related activities | 2,000 | 10-15 business days |
| Smart Visa | Highly skilled professionals and entrepreneurs | 10,000 | 30 business days |
| Long-Term Resident (LTR) Visa | Long-term stay for retirees and wealthy foreigners | 50,000 | 30-45 business days |
Key Considerations
When applying for any visa, you'll need to complete the process through the Immigration Bureau of Thailand or at a Royal Thai Embassy or Consulate-General abroad. Each visa type has specific eligibility criteria, so ensure you review the How To Apply and Documents Checklist guides to gather the necessary documentation.
Important: Ensure you are not currently in Thailand when applying for an e-Visa, as this is a common pitfall that can lead to application denial.
How Long Does It Take?
The processing time for each visa varies. For instance, a Tourist Visa typically takes 5-10 business days, whereas a Smart Visa can take up to 30 business days. The processing time for a Long-Term Resident Visa can be even longer, ranging from 30 to 45 business days.
Tip: Apply well in advance of your planned travel date to accommodate any potential delays.
Fee Payment and Confirmation
Once you have completed your application and uploaded all required documents, you will need to pay the visa fee online. After payment, you will receive an e-Visa confirmation document via email. This document is essential for your entry into Thailand.
For more detailed information on visa processing times, visit our Processing Times page. Additionally, if you're planning to work remotely or need more guidance on suitable visas, explore the Digital Nomad section for tailored advice.
Practical Advice
#Important: You cannot apply for an e-Visa while you are currently in Thailand. Ensure you are outside the country when you lodge your application.
Avoid Common Pitfalls
- Upload Documents Properly: Always verify that all required supporting documents are uploaded during your application process. Missing documents can delay or invalidate your application.
- Stay Updated: Visa requirements and processes can change. Regularly check the official Immigration Bureau of Thailand website for the latest information.
- Review Eligibility: Ensure you meet the specific eligibility criteria for the visa type you are applying for. For instance, those looking into the Smart Visa should consider the specific requirements for this category.
Navigating the Application Process
- Create an Online Account: Start by setting up an account on the Thai e-Visa website.
- Fill Out the Application: Carefully fill in the details required in the online application form.
- Upload Documents: Upload all necessary documents, such as your passport and any other required proofs.
- Pay Fees: Complete the payment of the visa fee online.
- Receive Confirmation: Await the e-Visa confirmation, which will be sent to your email.
Tip: Use the Documents Checklist to ensure no required document is missing.
Preparing for Your Arrival
- Personal Document Safety: Keep digital and physical copies of your e-Visa confirmation and important documents. You may need to present them upon arrival.
- Understand Visa Conditions: Each visa type, such as the Non Immigrant B or Long-Term Resident Visa, has specific conditions. Review these to ensure compliance during your stay.
- Plan for Extensions: If you intend to stay longer, familiarize yourself with the Visa Extension Guide.
Timing and Processing
- Processing Times: Visa processing times can vary, so plan ahead. Check the Processing Times for a better estimate.
- Application Timelines: It's advisable to apply well in advance of your intended travel date to accommodate any delays.
By being mindful of these aspects, you can navigate the process more smoothly and increase the likelihood of a successful visa application. Always verify details on the official Immigration Bureau website to ensure compliance with the latest regulations.
Pitfalls to Avoid
#Important: Ensure you are not in Thailand when applying for an e-Visa, as being in the country can lead to application denial.
Common Application Errors
-
Applying While in Thailand: A frequent mistake is attempting to apply for an e-Visa while already in Thailand. This will result in automatic rejection, as applications must be lodged from outside the country.
-
Incomplete Document Uploads: Many applicants neglect to upload all required supporting documents. This can delay the process or lead to denial. Make sure to include documents like a valid passport, proof of accommodation, and any other specific requirements relevant to your visa type.
Issues with Online Application
-
Account Setup Problems: When creating an account on the Thai e-Visa website, ensure your contact information is accurate and corresponds to the details on your passport. Discrepancies can cause issues later in the process.
-
Payment Errors: Make sure to use a payment method that is accepted by the Thai e-Visa system to avoid transaction failures. Verify that your payment was successful and keep the receipt as proof.
Tip: Regularly check your email, including the spam folder, for correspondence from the Immigration Bureau. Missing important communications can result in delays.
Misunderstanding Visa Types
-
Choosing the Wrong Visa: Selecting an inappropriate visa type for your situation can complicate your plans. For instance, if you're planning a long-term stay, consider options like the Long-Term Resident Visa rather than a short-term Tourist Visa.
-
Ignoring Visa Extensions: If you're planning to stay longer than your initial visa allows, familiarize yourself with the Visa Extension Guide to avoid overstaying and potential penalties.
Visa Processing Delays
-
Failure to Review Processing Times: Thoroughly review the estimated processing times for your visa type, as these can vary. Applying too close to your intended travel date can lead to stress and potentially needing to reschedule your trip.
-
Overlooking Eligibility Criteria: Each visa category has specific eligibility requirements. For example, the Non Immigrant Oa visa has different criteria compared to the Destination Thailand. Make sure you meet all requirements before applying.
By avoiding these pitfalls, you can significantly increase your chances of a successful visa application and enjoy your time as a digital nomad in Thailand without unnecessary hassles.
Real Scenarios
#A freelance graphic designer from New Zealand wanted to embark on a long-term stay in Thailand to explore the vibrant digital nomad community in Chiang Mai. As a digital nomad, she intended to apply for the Non Immigrant Oa visa to facilitate her extended stay. She began by creating an account on the Thai e-Visa portal and reviewing the specific eligibility criteria for the visa. Aware of the necessity to be outside Thailand during the application, she ensured she was in New Zealand throughout the process. She uploaded all required documents, including her passport and proof of sufficient funds, and paid the visa fee online. After waiting a few weeks, she received her e-Visa confirmation via email, allowing her to plan her move to Thailand with confidence.
Scenario: Tech Consultant Opting for the Smart Visa
A tech consultant from Canada was considering relocating to Thailand to leverage the opportunities within the country's burgeoning tech scene. He had heard about the benefits of the Smart Visa, which offers longer stays and fewer reporting requirements. To qualify, he needed to demonstrate his expertise and secure an employment contract with a Thai startup. He consulted with the Immigration Bureau of Thailand and verified the specific documentation required, including his degree and professional credentials. After submitting his application through the online portal, he was called for an interview at the Royal Thai Embassy in Ottawa. The process took approximately two months, but once approved, he received a visa that allowed him to work and live in Thailand for an extended period, enhancing his career prospects significantly.
FAQs
What is the cost of the application fee for the Smart Visa as mentioned in the Thailand Digital Nomad Complete Guide?
How can the Thailand Digital Nomad Complete Guide help avoid common pitfalls in the visa application process?
How long does the Immigration Bureau of Thailand take to process an e-Visa as per the Thailand Digital Nomad Complete Guide?
What are the specific document requirements for the Thailand Digital Nomad Complete Guide e-Visa application?
Can I combine a tourist visa and a Long-Term Resident Visa using the Thailand Digital Nomad Complete Guide?
What is the process for obtaining a Long-Term Resident Visa according to the Thailand Digital Nomad Complete Guide?
What steps does the Thailand Digital Nomad Complete Guide suggest for checking eligibility before applying for a visa?
Sources
Last reviewed: March 1, 2026
VisaMind provides informational guidance only and is not a government agency. This is not legal advice. Requirements can change and eligibility depends on your specific facts. If your case is complex or high-stakes, consult a licensed immigration attorney.
Next steps
Requirements vary by nationality, purpose, timeline, and case details. Use Find My Visa to get a personalized checklist for Thailand with official sources and deadlines.
Find my visa