Official sources referenced
What to Know Before Applying
#Before you embark on the journey to apply for an Indian visa, it's crucial to understand the pre-application steps that will set the foundation for a successful application. The Government of India offers an online application process for e-Visas, which simplifies the initial steps for eligible travelers. Here's what you need to know before applying:
Determine Your Visa Category
Choosing the right visa category is the first and most important step. Depending on your purpose of visit, India offers various visa options:
- e-Tourist Visa: Ideal for those visiting for recreation, sightseeing, or casual visits to friends and relatives. More information can be found here.
- e-Business Visa: Suitable for business-related activities such as meetings or conferences. Visit e Business Visa for details.
- e-Medical Visa: For travelers seeking medical treatment in India. Check the E Medical Visa section for specifics.
- Employment Visa: If you are planning to work in India, explore the Employment Visa requirements.
Check Eligibility Requirements
Once you've identified the correct visa category, ensure you meet the eligibility criteria:
- Purpose of Visit: Ensure your travel objectives align with the visa category. For example, an e-Visa is appropriate for short-term courses or yoga programs.
- Valid Passport: Your passport must be valid for at least six months from the date of arrival in India, with at least two blank pages for stamping.
Important: The e-Visa application may be rejected if the uploaded documents and photographs do not meet the specified requirements. Ensure clarity and adherence to guidelines.
Gather Necessary Information and Documents
Preparing the required documentation in advance will streamline your application process:
- Photograph: A recent front-facing photograph with a white background is mandatory.
- Passport Copy: Upload the photo page of your passport that contains your personal details.
- Additional Documents: Depending on the visa type, additional documents such as a business card for business visas or medical letters for medical visas may be required.
Refer to the Documents Checklist for a comprehensive list of documents needed for each visa type.
Understand the Application Process
Familiarize yourself with the steps involved in the application process to avoid common pitfalls:
- Online Application: The e-Visa application is submitted online through the Bureau of Immigration's official website.
- Instruction Review: Prior to lodging your application, thoroughly review the instructions specific to your eligibility category.
- Submission: Ensure all required sections are completed and necessary evidence is attached.
Tip: Apply online to avoid mail delays and receive immediate confirmation of your application.
By following these steps, you will be well-prepared to navigate the Indian visa application process efficiently. For more detailed guidance, visit the Visa Refusal Reasons page to understand potential pitfalls and how to avoid them.
The Application Process
#To successfully apply for an Indian e-Visa, it's important to follow the detailed steps outlined below to ensure a smooth application process.
Step-by-Step Application Process
-
Determine Your Visa Type
Begin by identifying which e-Visa category suits your travel purpose. Common categories include the E Tourist Visa, E Business Visa, and E Medical Visa. Each category serves different purposes and has specific eligibility criteria.
-
Visit the Official Portal
Access the Bureau of Immigration's official website to initiate your application. The portal provides comprehensive instructions and guidelines specific to each visa type. Make sure to review these thoroughly to understand the requirements.
-
Gather Required Documents
Collect essential documents before starting your application. These typically include:
- A recent front-facing photograph with a white background.
- A scanned copy of the passport's bio page, showing personal details.
- Additional documents may be required based on the e-Visa category you are applying for.
Tip: Ensure that your photograph and document scans are clear and meet the specification requirements to prevent application rejection.
-
Complete the Online Application
Fill in the necessary details in the online application form. Double-check your information for accuracy, as errors can lead to delays or rejection. Pay attention to each section, especially those related to your travel purpose and personal details.
-
Upload Supporting Documents
Upload the required documents, including your photograph and passport page. Make sure the files are in the correct format and size as specified in the guidelines on the application portal.
-
Pay the Visa Fee
Proceed to the payment section and pay the visa fee as required. The fee varies depending on the visa type and duration of stay. Verify the current fee structure on the official website to ensure you pay the correct amount.
-
Submit Your Application
After completing the form and uploading the documents, submit your application. You will receive an Application ID, which you should note for future reference and tracking.
Important: The e-Visa application must be submitted at least 4 days before your date of arrival in India, and it is not available more than 120 days in advance.
What to Do After Submission
Once your application is submitted, you can track its status through the application portal using your Application ID. The processing times can vary, so check the Processing Times guide for more information.
By following these structured steps, you can efficiently navigate the Indian e-Visa application process. Ensure all documents are clear and meet the specifications to avoid any delays or rejections. For further guidance on required documentation, refer to the Documents Checklist.
Fees and Payment
#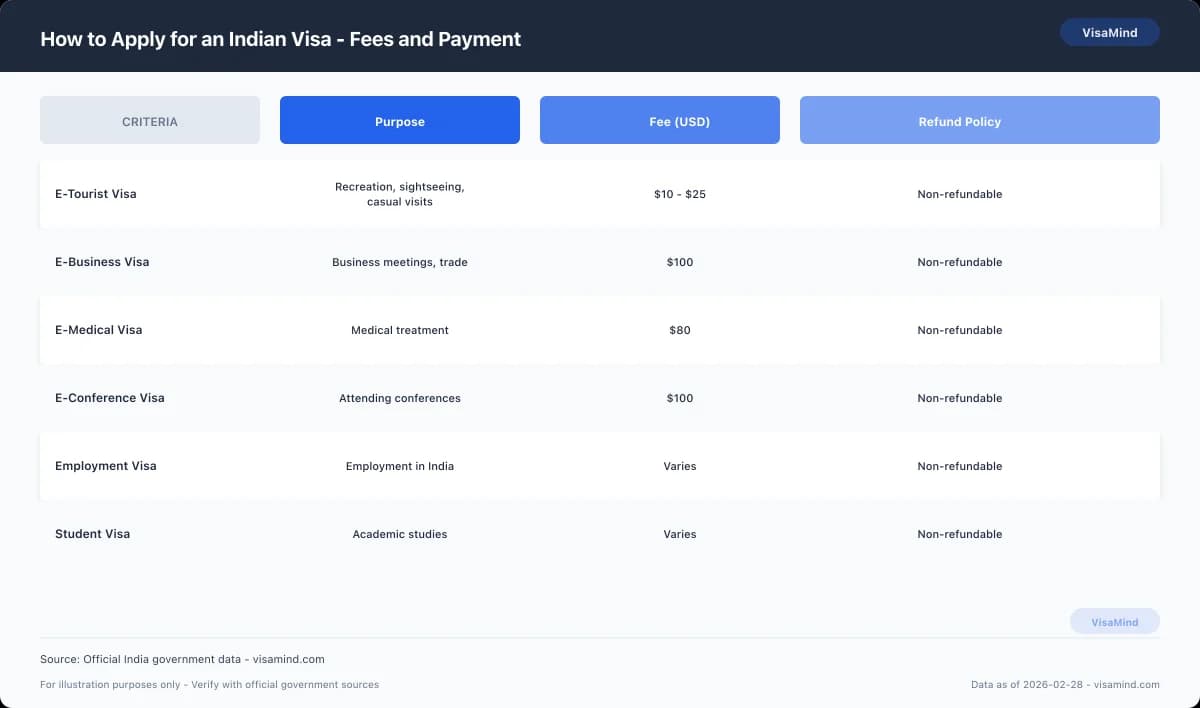
Understanding the fees and payment options is crucial. The application fee varies based on the type of visa you are applying for, such as an E Tourist Visa or an E Business Visa. Below, you'll find a comparison of different visa types, their eligibility, costs, and timelines.
Visa Fees and Payment Options
| Visa Type | Eligibility | Cost (USD) | Processing Time (Days) |
|---|---|---|---|
| E Tourist Visa | Tourism, recreation, visiting friends/relatives | 10-25 | 3-5 |
| E Business Visa | Business activities, company meetings | 20-40 | 3-5 |
| E Medical Visa | Short-term medical treatment | 10-25 | 3-5 |
| Employment Visa | Working in India | 100-200 | 7-10 |
| Student Visa | Studying in India | 75-100 | 7-10 |
Important: Visa fees are non-refundable, even if your application is rejected. Ensure your documents meet the specifications to avoid unnecessary rejections.
Payment Methods
To lodge your visa application, you can pay the required fees through several methods. The online application system typically accepts major credit and debit cards. You may also have the option to use payment gateways specific to your country.
Refund Policy
The Indian visa application fees are non-refundable. This means that once you have paid the fee, you will not receive a refund, regardless of the outcome of your application. It is essential to ensure all your documents are in order before applying. For more details on necessary documents, refer to the Documents Checklist.
Tip: To avoid delays, ensure your uploaded documents and photos comply with the Visa Refusal Reasons guide's specifications. This will help minimize the risk of application rejection due to non-compliance with document standards.
Always verify the latest fees on the official Bureau of Immigration website before proceeding with your application.
What Happens Next
#Once you've applied for an Indian visa through the online application process, it's natural to wonder what happens next. Here’s a concise overview of the steps and tools available after your application is lodged.
Tracking Your Application
- Online Tracking: You can track the status of your application on the Bureau of Immigration's official website. Use your application reference number to access updates.
- Email Notifications: Expect to receive email notifications at various stages of the process, which will keep you informed of any changes or additional requirements.
Tip: Regularly check the email you used for your application to ensure you don't miss any important updates or requests for additional information.
Expected Timeline
- Processing Time: Generally, an e-Visa application is processed within 3-5 business days. However, processing times may vary, so it is advisable to apply well in advance of your intended travel date.
- Delays: If you experience delays beyond the usual timeframe, consult the Processing Times guide for potential reasons and solutions.
Actions While Waiting
- Document Review: While waiting, double-check that all your documents are in order, as missing or incorrect documents can lead to delays or rejections.
- Prepare for Travel: If your visa is approved, ensure you have all necessary travel arrangements in place, such as flights and accommodations.
Important: Ensure that your uploaded documents and photographs meet the specifications outlined in the Documents Checklist to avoid application rejection.
What If There's an Issue?
- Rejection: If your application is rejected, review the Visa Refusal Reasons to understand potential pitfalls and prepare for a possible re-application.
- Appeals: While there is no formal appeal process for e-Visa rejections, addressing the identified issues and reapplying with corrected information is often the best course of action.
Understanding these steps and utilizing available resources can help streamline your application journey.
When Things Don't Go as Planned
#There may be instances where things don't go as planned. Understanding your options for appeals, reapplication, and administrative reviews is important.
What If Your Application Is Rejected?
If your application for an Indian visa is rejected, it is crucial to understand the potential reasons and the next steps you can take. Common reasons for rejection may include unclear or improperly formatted photographs and documents. For more information on potential pitfalls, refer to the Visa Refusal Reasons.
Important: If your documents and photographs do not meet the specified requirements, your application is likely to be rejected.
Can You Appeal a Visa Rejection?
India does not have a formal appeal process for visa rejections. However, you may address the reasons for rejection and reapply. Here are steps to consider:
- Review the Rejection Notice: Understand the specific reasons given for the rejection.
- Correct Any Issues: Ensure all documents, including your photograph, meet the necessary specifications.
- Gather Additional Evidence: If applicable, provide additional documentation to support your application.
For a detailed list of documents required, visit the Documents Checklist.
Is Administrative Review an Option?
While India doesn't offer an administrative review process for visa applications, it is possible to reach out to the relevant Indian mission or the Foreigners Regional Registration Office (FRRO) for clarification. Although this won't change the decision, it may offer insights into any misunderstanding or missing information.
Reapplying for a Visa
When reapplying, address all previous issues meticulously. This may involve obtaining a new passport photo, ensuring all documents are clear and legible, and verifying that your application aligns with your visa's purpose—be it for Business, Medical, or Study.
Tip: Make use of the online application system for a more streamlined process and to track your application status.
While setbacks can be frustrating, understanding the steps to reapply or gather additional information can help you navigate the process more effectively. Always verify the most current information and requirements on the official Indian visa websites.
Timeline Overview
#The process of applying for an Indian e-Visa involves several steps, each with its own timeline. Understanding these steps will help you plan your travel efficiently.
How Long Does the Application Take?
The Indian e-Visa application is typically processed within 3 to 5 business days. However, it is advisable to apply at least a month in advance to account for any unexpected delays. This timeline begins once you have successfully submitted your application online.
Key Steps in the Application Timeline
-
Prepare Your Documents: Before you start your application, ensure you have all the necessary documents. This includes a recent passport-size photograph and a scanned copy of the passport's photo page. These documents must meet specific requirements to avoid rejection.
-
Submit Your Application: After gathering your documents, you can proceed to submit your application through the Bureau of Immigration's official online portal. This step includes uploading your documents and paying the visa fee.
-
Application Processing: Once submitted, your application will be reviewed. This is the period when the 3 to 5 business days processing time applies. During this time, you can track the status of your application online.
-
Receive Your e-Visa: If approved, your e-Visa will be sent directly to your email. Ensure you print a copy to present upon arrival in India.
Tip: Double-check that your documents are clear and adhere to the specifications provided. Overlooking these details can result in application delays or rejection.
What If There Are Delays?
In case your e-Visa is delayed beyond the typical processing time, consult the Processing Times guide for insights into possible reasons and next steps. Delays can occur due to high application volumes or missing information.
By understanding and adhering to this timeline, you can ensure a smoother application process and enjoy your trip to India without unnecessary stress. For more detailed information on visa types, consider reviewing related visa options such as the E Medical Visa and the Business Visa.
The Online Portal
#Important: Ensure that all uploaded documents and photographs meet the specified guidelines to avoid application rejection.
Accessing the Official e-Visa Portal
To apply for an Indian e-Visa, you must use the official Government of India e-Visa portal. This online system is designed to streamline the application process for eligible travelers. The portal is accessible via the Bureau of Immigration's official website. Here, you can find detailed instructions and eligibility criteria for different visa categories.
Eligibility Criteria for e-Visa
The e-Visa is available for various purposes, including tourism, business, medical treatment, and attending conferences. To determine if you are eligible, review the specific criteria on the portal. Generally, the e-Visa is suitable for travelers whose visit is for recreation, sightseeing, or attending short-term courses.
Steps to Lodge Your e-Visa Application
- Visit the Official Portal: Start by navigating to the e-Visa portal.
- Review Eligibility: Check the detailed instructions for your visa category to ensure you meet all requirements.
- Prepare Your Documents: Gather necessary documents such as a recent front-facing photograph with a white background and the photo page of your passport.
- Complete the Application: Follow the online instructions to fill in the required details.
- Upload Documents: Ensure that your documents are clear and meet the portal's specifications.
- Submit and Track: Once submitted, you can track your application's status through the portal.
Tip: Applying online allows you to receive an immediate receipt number, which is useful for tracking your application.
Related Visas and Additional Resources
For more information on other visa types, consider checking out details on the Employment Visa or the Student Visa. Additionally, guides like Visa Refusal Reasons and Documents Checklist may be helpful in ensuring a successful application.
Biometrics and Appointments
#Important: Ensure you have all required documents prepared before attending your biometric appointment to avoid delays.
What Are Biometrics?
Biometrics involve the electronic capture of your fingerprints and photograph, an essential step for many Indian visa applications. The collection of biometrics is a security measure to verify your identity. This step is required for most visa types, including the Employment Visa and Business Visa.
Where and How to Schedule Your Appointment
For those applying for a visa to India, biometric data collection typically occurs at VFS Global centers, which are authorized by the Indian government to handle visa applications. You must schedule an appointment at a VFS center once you have completed the online application process. The appointment ensures that the center can accommodate you and collect your biometrics efficiently.
- To Schedule:
- Visit the VFS Global website specific to your country.
- Select the type of visa you are applying for.
- Choose your preferred date and time for the appointment.
Tip: Book your appointment as soon as possible, especially during peak travel seasons, to secure your preferred date and time.
What to Bring to Your Appointment
When attending your biometric appointment, it is crucial to carry the necessary documents to facilitate the process. Here’s a checklist of what you need:
- A printed copy of your online visa application confirmation
- Your original passport, valid for at least six months beyond your planned stay in India
- Any additional documents required for your specific visa category, such as a letter of invitation for a Student Visa or Medical Visa
- A printout of your appointment confirmation
After Your Appointment
After your biometrics are collected, the data is securely transmitted to the relevant Indian authorities for processing. It typically takes a few days for the biometrics to be linked with your visa application. Once the process is complete, you can track the status of your application through the VFS Global website or contact the Foreigners Regional Registration Office (FRRO) if you are already in India.
Ensure you follow up with the Visa Extension Guide if you need to extend your stay after your initial visa period.
By understanding the biometrics and appointment process, you can better prepare for your visa application journey to India.
Visa Application Centre Visit
#Once you've completed your online visa application for India, the next step often involves visiting a Visa Application Centre, such as VFS Global. Here's a step-by-step guide to help you navigate this process smoothly.
-
Schedule an Appointment
After your online application is submitted, you'll need to schedule an appointment at a VFS Global centre. It's important to select a date and time that suits you, as these appointments are crucial for submitting your biometric data and supporting documents. Visit the official VFS Global website for details on appointment scheduling.
-
Prepare Your Documents
Gather all necessary documents ahead of your appointment. This typically includes your passport, a printed copy of your visa application, confirmation of your appointment, and any additional documents specified for your visa category. For a detailed checklist, refer to our Documents Checklist.
-
Visit the Centre
Arrive at the VFS Global centre early to ensure you have ample time for check-in and security procedures. Bring all required documents and be prepared to provide biometric data, such as fingerprints and a photograph. The staff will guide you through the process, ensuring all your application materials are in order.
Tip: Ensure your uploaded documents and photo meet the specifications to avoid delays or rejections.
Completing Your Centre Visit
Once your biometric data is collected and documents are verified, your application will be forwarded to the appropriate Indian authorities. VFS Global does not make decisions on visa applications; they facilitate the submission process.
-
Track Your Application
After your appointment, you can track the status of your application through the VFS Global portal. Keep your receipt and tracking number handy for this purpose. For more information on processing timelines and what to expect, see our Processing Times guide.
-
Receive Your Visa
Once your visa is approved, you will be notified by the Indian mission that processed your application. You can then collect your passport from the VFS Global centre or have it delivered, depending on the service you selected during your application.
Important: Double-check the visa details in your passport for accuracy before your travel.
For more details on specific types of visas, such as the Tourist Visa or Business Visa, visit our respective pages.
FAQs
Can I switch from an e-Tourist Visa to an Employment Visa while in India?
What documents are required for the Indian Student Visa application process?
Is it possible to combine a business trip and a short yoga course on an Indian e-Tourist Visa?
What should I know about biometrics and appointments for applying for an Indian Visa?
How can I track the status of my Indian Visa application through the online portal?
What happens if my e-Visa application is rejected due to unclear documents?
Can I apply for an Overseas Citizen of India (OCI) card while holding an Indian Employment Visa?
Sources
Last reviewed: March 1, 2026
VisaMind provides informational guidance only and is not a government agency. This is not legal advice. Requirements can change and eligibility depends on your specific facts. If your case is complex or high-stakes, consult a licensed immigration attorney.
Next steps
Requirements vary by nationality, purpose, timeline, and case details. Use Find My Visa to get a personalized checklist for India with official sources and deadlines.
Find my visa