Official sources referenced
Pre-Application Checklist
#It's crucial to start by understanding the specific requirements and eligibility criteria for the visa category you're interested in. The Directorate General of Immigration (Ditjen Imigrasi) manages various visa types, each with unique prerequisites. Below is a pre-application checklist to guide you through the initial steps.
Choosing the Right Visa Category
- E-Visa (Tourist/B211A): Ideal for tourists planning short stays.
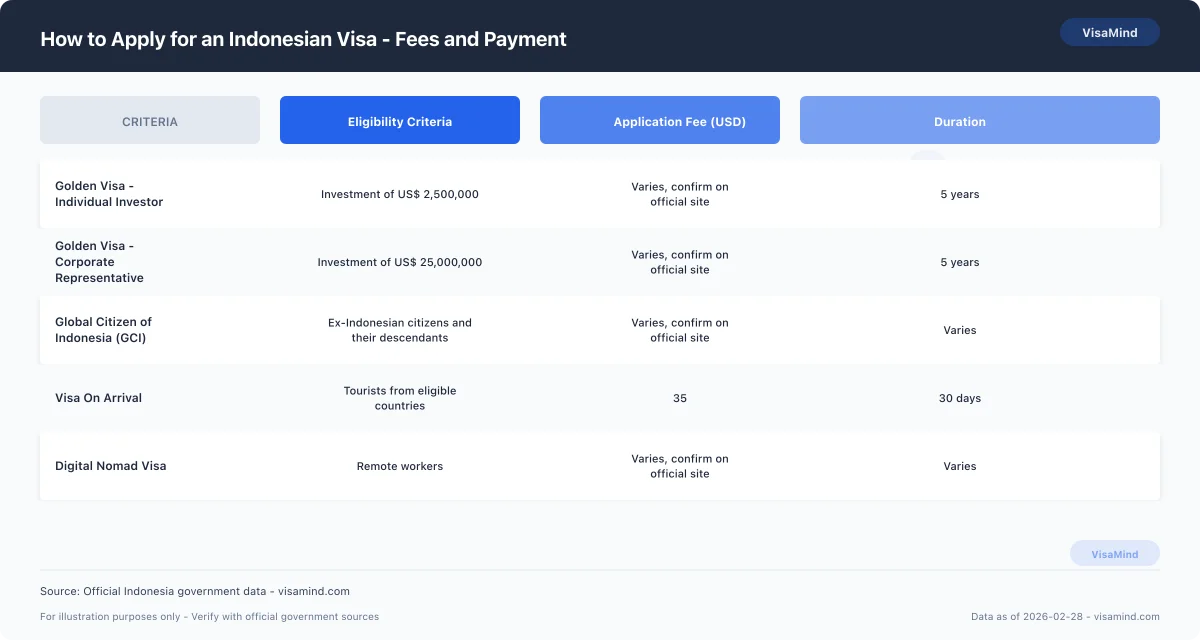
- Golden Visa: For those who meet the investment or economic contribution criteria.
- KITAS: Available for work, study, or retirement purposes.
Tip: Use the E Visa Tourist for short-term travel and the Golden Visa for investment opportunities in Indonesia.
Gathering Required Information
- Personal Identification: Ensure your passport is valid for at least six months from your planned entry.
- Financial Proof: For the Global Citizen of Indonesia (GCI) visa, demonstrate a minimum income of USD 1,500 per month or USD 15,000 per year.
- Investment Proof: Required for Golden Visa applicants, involving specific investment commitments.
Checking Eligibility
- Global Citizen of Indonesia (GCI): Tailored for diaspora and ex-Indonesian citizens wishing to return.
- Golden Visa: Designed for those making significant economic contributions.
- Digital Nomad Visa: Perfect for remote workers Digital Nomad Guide.
Important Considerations
- Payment Methods: Visa fees can be paid via SIMPONI or credit/debit cards (Mastercard, Visa, JCB).
- Arrival Card Submission: Submit your arrival card within the required timeframe to avoid delays.
Important: Failure to submit the arrival card on time can lead to complications with your entry into Indonesia.
By thoroughly completing this pre-application checklist, you position yourself for a smoother application process with Ditjen Imigrasi. Ensure you review specific instructions for your chosen visa category and have all necessary documents ready. For detailed document requirements, refer to the Documents Checklist.
How to Submit Your Application
#Determine Your Visa Type
Before you start your application, identify the visa category that best suits your purpose of travel to Indonesia. Whether you are planning a short visit, work, study, or retirement, each visa type has specific requirements and eligibility criteria. For example, the Visa on Arrival is suitable for short stays, whereas the Kitas Work is designed for employment purposes. Review the Documents Checklist for detailed requirements for each type.
Gather Required Documentation
Once you have determined the appropriate visa, collect all necessary documents. This typically includes a valid passport, recent passport-sized photographs, proof of sufficient funds, and any specific documents related to your visa category, such as an investment commitment for the Golden Visa or proof of employment for the Kitas Work visa. Ensure that all documents are current and comply with the guidelines provided by the Directorate General of Immigration.
Review Application Instructions
Visit the official Directorate General of Immigration website to review the specific instructions for your visa category. It's crucial to understand the requirements and steps in detail before proceeding. For instance, certain visas may require sponsorship letters or additional approvals. Reviewing the Visa Refusal Reasons guide can also help you avoid common pitfalls.
Complete the Application Process
After gathering your documents, proceed to fill out the visa application form. Ensure every section is complete and accurate. For digital applications, you can apply online through the Directorate General of Immigration's e-visa platform. If you're applying for a visa such as the Digital Nomad, make sure to follow the specific steps for that category.
Make the Visa Fee Payment
Pay the visa application fee using the methods accepted by the Directorate General of Immigration. Payments can typically be made via SIMPONI, Mastercard, Visa, or JCB credit/debit cards. Retain your payment receipt as you'll need it for tracking your application status.
Submit Your Application
Submit your completed application along with the required documents to the Directorate General of Immigration. If you applied online, you would generally receive a confirmation email with a reference number. For paper applications, ensure they are sent to the correct address and method specified by the immigration authorities.
Tip: Applying online can expedite the process and provide you with immediate confirmation and a record of submission.
Track Your Application Status
After submission, monitor the status of your application through the Directorate General of Immigration's online portal or contact their support if necessary. Stay informed about any additional steps or documents that might be required.
Important: Ensure you submit any additional information or documents requested by immigration authorities promptly to avoid processing delays.
By following these steps meticulously, you can navigate the application process efficiently and increase your chances of obtaining your Indonesian visa. Always verify the latest procedures and requirements on the official Directorate General of Immigration website.
Application Costs
#
Understanding the costs involved is essential. The Directorate General of Immigration (Ditjen Imigrasi) oversees the application fees, payment methods, and refund policies for various visa categories. Below is a detailed look at these elements.
Visa Application Fees and Payment Methods
Different visa types come with distinct application fees. Payment can typically be made using SIMPONI or credit/debit cards such as Mastercard, Visa, or JCB. Below is a comparison of some popular Indonesian visas:
| Visa Type | Application Fee (USD) | Payment Methods |
|---|---|---|
| E-Visa Tourist | 50 | SIMPONI, Mastercard, Visa, JCB |
| Visa on Arrival | 35 | Cash, SIMPONI, Mastercard, Visa, JCB |
| Golden Visa | 500 | SIMPONI, Mastercard, Visa, JCB |
| Digital Nomad Visa | 100 | SIMPONI, Mastercard, Visa, JCB |
Tip: Using SIMPONI for payment ensures a quick and traceable transaction.
Additional Costs and Surcharges
While the primary focus is often on the visa application fee, be aware that additional costs may arise based on your situation:
- Service Fees: Depending on the application method, there may be service fees for processing.
- Express Service Charges: If you need expedited processing, additional charges may apply.
- Surcharges: These can vary based on the payment method used or the urgency of processing.
Refund Policy
Refunds for visa application fees are generally not available, as the fees cover the processing of the application itself, regardless of its outcome. However, if you've been charged incorrectly or there was an error in the transaction, you may contact Ditjen Imigrasi for further guidance.
Important: Always verify the current fees and policies on the official Directorate General of Immigration website, as they can change.
When planning your application, consider both the direct costs and any potential extra expenses. For more information on specific visa requirements, you can visit the Documents Checklist or explore guides like Visa Refusal Reasons to minimize application risks.
Tracking Your Application
#Tip: Use the Directorate General of Immigration's online tracking system to monitor your visa application's status and receive updates promptly.
How to Track Your Application
- Online Tracking System: Once you have lodged your visa application, you can track its progress through the Directorate General of Immigration's official website. You'll need your application reference number, which is provided upon submission.
- Email Notifications: During the application process, you'll receive email updates at key stages. Ensure that you check your email regularly, including your spam folder, for any communications from the Directorate General of Immigration.
Expected Timeline for Processing
- Standard Processing Time: Typically, the processing time for an Indonesian visa can range from 5 to 15 business days. However, this can vary depending on the type of visa and the volume of applications.
- Expedited Processing: For certain visas, expedited processing may be available for an additional fee. It is advisable to check the Processing Times guide for the most current information.
What to Do While Waiting
- Prepare for Arrival: Use this time to gather any additional documents you may need upon arrival in Indonesia, such as proof of onward travel or accommodation details.
- Explore Visa Options: If you are considering a long-term stay, familiarize yourself with other visa types, like the Kitas Work or Digital Nomad visas, which may better suit your needs.
- Plan for Contingencies: Understand what to do if your visa is delayed or denied by reviewing the Visa Refusal Reasons guide.
Important: If your visa is approved, remember to download it from the official platform and have it ready for your travel to Indonesia.
By keeping track of your application and preparing for your journey, you can ensure a smoother transition to your time in Indonesia. For any uncertainties, always refer to the official Directorate General of Immigration website for the most accurate and updated information.
If Something Goes Wrong
#If your Indonesian visa application encounters any issues, it's important to understand your options for addressing them. Here’s what you should know if something goes wrong.
What If Your Application Is Rejected?
If your visa application is rejected by the Directorate General of Immigration (Ditjen Imigrasi), you typically receive a notification explaining the reason. Common reasons include incomplete documentation or failure to meet eligibility criteria. Understanding the refusal reason can help you decide your next steps, which may include:
- Reapplication: You can submit a new application with the necessary corrections or additional documents. Be sure to review the Visa Refusal Reasons guide to avoid common pitfalls.
- Administrative Review: If you believe the decision was made in error, you can request a review by providing additional evidence or clarification.
Important: Ensure all documents meet the specified criteria and that you provide clear evidence of eligibility to avoid common rejection reasons.
Appeal Rights
In some situations, you may have the right to appeal a visa decision. This process involves submitting a formal request for reconsideration to Ditjen Imigrasi. The appeal must be lodged within a specific timeframe, which is usually within 30 days of receiving the decision.
- Gather Supporting Documents: Collect any additional documents or information that can support your case.
- Submit an Appeal: Follow the instructions provided by Ditjen Imigrasi for submitting your appeal. This may involve submitting a written statement outlining why you believe the decision should be overturned.
Can You Request an Administrative Review?
An administrative review is a formal process where your application is re-evaluated by a different officer at Ditjen Imigrasi. This is particularly useful if you suspect an error in processing. To request this review:
- Prepare Your Case: Compile any new evidence or documentation that supports your eligibility.
- Submit Your Request: Follow the administrative review process outlined by Ditjen Imigrasi. Typically, this involves submitting a written request and any additional documents.
Tip: Keep copies of all correspondence and submissions to Ditjen Imigrasi for your records.
Next Steps After a Decision
While waiting for your appeal or administrative review outcome, you can explore alternative visa options. Consider applying for other types of permits like the Visa On Arrival or E Visa Tourist, depending on your situation and eligibility. Each visa type has specific requirements and processes, which you can review in our E Visa Tourist Vs Visa On Arrival guide.
By understanding your options and taking proactive steps, you can improve your chances of a successful visa application.
Expected Timeline
#Understanding the expected timeline is crucial for planning your travel and stay effectively. The timeline can vary depending on the type of visa you are applying for, but here is a general overview to help you navigate the process.
Application Processing Time
- E-Visa (Tourist / B211A): Typically processed within 3 to 5 business days.
- Visa on Arrival (VOA): Issued instantly at designated entry points upon arrival in Indonesia.
- KITAS (Limited Stay Permit): Processing may take up to 10 to 14 business days after submitting all required documents.
- Golden Visa and Global Citizen of Indonesia (GCI): These visas can take up to 30 business days due to more comprehensive requirements and evaluations.
Tip: For faster processing, ensure all required documents are accurately prepared and submitted in advance. Visit the Documents Checklist for a complete list of necessary documents.
Steps in the Visa Application Process
- Document Gathering: Prepare all necessary documents, including proof of income and investment commitments if applicable.
- Submission and Payment: Lodge your application with the Directorate General of Immigration and make the visa fee payment through SIMPONI or using a Mastercard, Visa, or JCB card.
- Approval and Download: Once approved, download your visa from the official website.
Key Considerations
- Arrival Card Submission: Ensure you submit an arrival card within the required timeframe before arriving in Indonesia. Failure to do so may affect your entry.
- Visa Extensions: Some visas, such as the KITAS Work, may be extended. Refer to the Visa Extension Guide for more details.
Important: Processing times can vary based on the visa type and individual circumstances. Always verify the latest timelines on the official Directorate General of Immigration website to avoid surprises.
Which System to Use
#To apply for an Indonesian visa, you need to use the official online portal managed by the Directorate General of Immigration (Ditjen Imigrasi). This system streamlines the visa application process by allowing you to submit your application and required documents digitally.
Accessing the Online System
You can access the visa application portal through the official Ditjen Imigrasi website. This portal is essential for various visa types, including the E Visa Business and Kitas Investor. Here’s how you can begin:
- Visit the Official Website: Navigate to Ditjen Imigrasi's website to find the visa application portal.
- Create an Account: If you are a new user, you will need to register by providing your email address and creating a secure password.
- Log In: Use your credentials to log into the portal and start your application process.
System Features and Payment Methods
Once logged in, the portal provides several features that facilitate the visa application process:
- Document Upload: You can upload required documents, such as proof of income for Global Citizen of Indonesia (GCI) applicants or investment commitments for Golden Visa applicants.
- Visa Fee Payment: Payments can be made securely through SIMPONI or using Visa, Mastercard, or JCB credit/debit cards.
- Application Tracking: The system allows you to check the status of your application and communicate with immigration authorities if needed.
Important: Ensure that all document uploads are clear and comply with the specified formats to avoid delays in processing.
Tips for Using the Portal
- Review Eligibility: Before starting your application, review the Documents Checklist to ensure you meet all eligibility requirements.
- Stay Informed: Use the portal to access the latest instructions and guidelines, which can help you avoid common pitfalls such as failing to submit an arrival card on time.
- Download Approved Visas: Once your visa is approved, you can download it directly from the portal.
Tip: Always keep a digital copy of your confirmed application details and payment receipts for your records.
By leveraging the official Ditjen Imigrasi system, you can efficiently manage your visa application process, from submission to downloading your approved visa.
Your Biometrics Appointment
#Before you can finalize your Indonesian visa application, attending a biometrics appointment is a crucial step. This involves having your fingerprints and photograph taken, which are necessary for most visa types. Below is what you need to know about scheduling and attending your biometrics appointment.
Where to Attend Your Biometrics Appointment
You can complete your biometrics at designated VFS Global centers or Indonesian embassies and consulates. It is important to check the nearest location that offers biometrics services, as not all centers may provide this.
- VFS Global Centers: Located in several countries, these centers facilitate the biometrics collection process outside Indonesia.
- Indonesian Embassies or Consulates: If you prefer, you can also arrange an appointment at the nearest Indonesian embassy or consulate.
Tip: Book your biometrics appointment as soon as possible after lodging your visa application to avoid delays.
How to Schedule Your Biometrics Appointment
Scheduling your biometrics appointment is typically done online or by contacting the VFS center or embassy directly. Follow these steps to secure your appointment:
- Check Eligibility: Ensure that your specific visa type requires biometrics. For example, E Visa Business and Kitas Work might require biometrics as part of the application process.
- Book Online: Use the online booking system provided by VFS Global or the embassy's website.
- Confirm Appointment: After booking, you will receive a confirmation email with details of your appointment.
Preparing for Your Appointment
Before attending your biometrics appointment, make sure you have all the necessary documents ready. This usually includes:
- Appointment Confirmation: Printed or digital copy.
- Passport: Original and a photocopy.
- Visa Application Receipt: Proof of payment for the visa application fee.
- Supporting Documents: Any additional documents specific to your visa type, such as those listed in the Documents Checklist.
Important: Failing to bring the required documents can result in rescheduling your appointment, leading to delays in your application process.
What Happens During the Appointment?
During your biometrics appointment, you will undergo the following:
- Fingerprints: All ten fingers will be scanned electronically.
- Photograph: A digital photograph will be taken.
- Verification: Your documents and identity will be verified against your application.
The biometrics data collected is securely stored and used by the Directorate General of Immigration to process your visa. Once your biometrics are complete, you can track your application progress through the Processing Times guide.
By successfully completing your biometrics appointment, you fulfill a key requirement in the Indonesian visa application process.
Booking Your Appointment
#-
Choose the Right Appointment Center
Once you have gathered the necessary documents for your Indonesian visa application, you'll need to book an appointment at an authorized visa application center. For most applicants, this will be a VFS Global center, which is responsible for handling visa submissions on behalf of the Directorate General of Immigration (Ditjen Imigrasi). Make sure to select a center that is convenient for you, keeping in mind that specific centers may handle different types of visa applications such as the E Visa Business or Kitas Investor.
-
Schedule Your Appointment Online
Visit the VFS Global website to schedule your appointment. You’ll need to provide information such as your visa type, personal details, and preferred date and time. It's advisable to book your slot well in advance, especially during peak travel seasons, to ensure availability. Double-check that you have selected the correct visa type and center location.
-
Prepare for Your Appointment
Before attending your appointment, ensure you have all the required documents ready. This typically includes your completed visa application, passport, photos, and any supporting documents relevant to your visa category, such as proof of financial means or an Investment commitment. For specific visa types like the Kitas Student or Social Cultural visa, additional documentation may be required.
Important: Arrive at least 15 minutes early for your appointment to account for any unexpected delays. Missing your appointment could significantly delay your visa processing.
-
Attend Your Appointment
On the day of your appointment, bring all your documents and any required fees. The VFS Global staff will assist with the submission of your application and ensure that all documents are in order. Keep a copy of your appointment confirmation and any receipts for your records.
Tip: Verify your document checklist using the Documents Checklist guide to avoid any last-minute issues at your appointment.
FAQs
What proof of income is required for a Global Citizen of Indonesia (GCI) visa application?
How can I track my Indonesian visa application status through the Directorate General of Immigration?
Is it possible to apply for a Golden Visa and a Digital Nomad Visa simultaneously in Indonesia?
What investment commitment is required for a Golden Visa application in Indonesia?
How do I schedule a biometrics appointment for an Indonesian visa application?
Can my spouse work on a dependent KITAS visa in Indonesia?
What happens if I fail to submit an arrival card before arriving in Indonesia?
Sources
Last reviewed: March 1, 2026
VisaMind provides informational guidance only and is not a government agency. This is not legal advice. Requirements can change and eligibility depends on your specific facts. If your case is complex or high-stakes, consult a licensed immigration attorney.
Next steps
Requirements vary by nationality, purpose, timeline, and case details. Use Find My Visa to get a personalized checklist for Indonesia with official sources and deadlines.
Find my visa